


Welcome to Instant RubyMine Assimilation. This book will take you through the RubyMine technology and help you become an expert with the use of this amazing programmers' tool for Ruby and Ruby on Rails programs. Resistance is futile—you will be assimilated and will become a happy, proficient, and efficient programmer as a result.
This recipe will describe the options available for installing RubyMine on the three major platforms—Windows, Mac, and Linux. It will briefly cover the steps for installation of the most recent version.
In order to proceed, you must have already installed a version of the Ruby programming language. The installers for these can be found at http://www.ruby-lang.org/en/downloads/.
It is recommended that you download the latest version of Ruby if you are a beginner, which is v2.0. Follow the instructions on the site mentioned previously, depending on your particular operating system.
RubyMine is an application that is written in Java and requires the Java Runtime Environment to work. We will need to download and install the appropriate version of Java as well. If we don't install Java first, then RubyMine will download and install the appropriate version for you the first time it starts. Java installation programs can be found at http://java.com/en/download/manual.jsp.
We will now install the actual RubyMine software depending on your operating system.
RubyMine can be found at http://jetbrains.com/ruby.
Let's have a look at the steps involved in installing RubyMine on a Mac OS X system:
Point your browser to the previous address and download the free trial of the software. This will be in the form of a standard Mac OS X disk image (DMG), as shown in the following screenshot:

Open the Disk Image (DMG) and drag the RubyMine file from the DMG to your
Applicationsfolder. As shown in the following screenshot, you can now open RubyMine from yourApplicationfolder by double-clicking on the RubyMine application:
Figure 1.2
The first window that you will see is the standard Mac OS X security warning about opening an application from the Internet, depending on your security settings. Select the Open button to continue.
We will then be presented with the opening Welcome window in RubyMine. We have successfully installed RubyMine and can proceed to the next lesson.
Now, let us look at the steps involved in installing RubyMine on Windows OS:
Download the RubyMine installer from http://jetbrains.com/ruby.
Click on the RubyMine executable and the first window that you will see is the standard Windows security warning about opening an application, depending on your security settings.
Select the Run button to continue. You will get the following RubyMine setup wizard window:

Follow the standard installation steps and select the defaults for the options presented.
When the installation finishes, you will be given an option to run RubyMine. Do this and you will see a screen that will ask you to import your settings from a prior version and then a screen asking for your license.
If you have a license, enter the two pieces of information into the fields provided and then hit OK.
Otherwise, just select the option Evaluate for free for 30 days and you will have your 30-day trial of the software. You can always enter your license later—after you have been assimilated.
Continue on and agree to the license agreement, and you will then be shown a screen similar to Figure 1.2, the screen showing the message Welcome to RubyMine.
Last but not least, let us look at the installation of RubyMine on a Unix environment.
Most of the X-Windows types of environments in the Unix/Linux world work the same, but we are now going to see the Ubuntu installation:
Point your browser to the same URL http://jetbrains.com/ruby and select the Download Free Trial link. This will begin the download of a
.tar.gzfile and depending on your environment, your browser might ask you to open it with the Archive Manager option, as shown in the following screenshot:
Select OK and the archive manager will show us a folder of the uncompressed files.
Click on the Extract button on the top toolbar of the archive manager and select your home folder to save the folder into.
Once extracted, we can then navigate to the new RubyMine folder and we will see a file called
Install-Linux.tar.txt.Follow the instructions contained in this file to complete the installation.
The main item to pay attention to is the second option in the file:
2. Open a console (ctrl-alt t) and cd into "{installation home}/bin" and type:
./rubymine.sh
to start the application.
Doing this will begin the application installation process.
A screen showing the options to agree to the license and the option checked for the 30-day trial will be presented with a screen like this:

Select the defaults for now and hit OK to continue.
If you run into any errors, some of the solutions are found below. If you have any other problems, you will have to consult the RubyMine website help system.
If you get an error while running the rubymine.sh file in Linux (Ubuntu) like the following:
ERROR: Cannot start RubyMine
No JDK found. Please validate either RUBYMINE_JDK, JDK_HOME or JAVA_HOME environment variable points to valid JDK installation.
In this case, you must install a Java Development Environment first and then re-run the rubymine.sh file as before.
To install Java on Ubuntu, you must enter several commands. There is a good tutorial on installing the Oracle JDK found at http://askubuntu.com/questions/55848/how-do-i-install-oracle-java-jdk-7.
Please note that the OpenJDK is not recommended for use with the RubyMine software.
Once this is complete, you can continue with the RubyMine installation as before.
Now, we will create a simple application/program along the lines of a Hello World program to make sure the environment is set up correctly, while explaining some of the initial features of the IDE as we go.
You should have already started the assimilation process by completing the recipe First contact – installing Ruby and RubyMine (Must know). If not, go back and restart the assimilation process.
When starting to learn a new language, it is customary to say hello, so let's get started:
Open RubyMine and you will be presented with the Welcome to JetBrains RubyMine window:

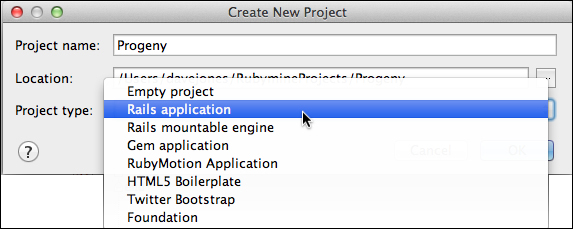
Select the option Create New Project.
Use the name HelloWorld in the first box and leave the other two options as default. We are going to start with a simple Ruby application, even though RubyMine can create many different types of project such as a Ruby on Rails project and Twitter Bootstrap Web project.
Your next task is to create a new Ruby file that we can use to begin building our first program.
Navigate to File | New … and you will be presented with a list of various choices of files to create.
Choose the File item, which is simply a Ruby file.
Name it
helloworld.rb. Don't forget the.rbextension, as this is necessary to distinguish it from a simple text file, which it really is anyway.Now, type in the following program into this new document that you created:
puts "Hello Biological Life Form. We are the Borg."
puts "We will add your biological and technological distinctiveness to our own."
puts "Resistance is futile."
This is your first Ruby program in RubyMine! Let's run it using the following steps and see what happens:
Navigate to Run | Run and you will see a window similar to this:

Select the helloworld configuration and it will execute your first Ruby script. The output of your program should then be shown in a window panel below your
helloworld.rbfile. Eachputscommand prints out the string to the console and appends a carriage return to the end automatically. RubyMine captures this output in the window at the bottom of the program.
You have successfully begun your assimilation into the collective—there is no stopping you now.
RubyMine keeps everything inside its various panels so that you don't have to keep switching between your editor, a terminal/console window, and your browser. It lets you see the output of your programs in the Run panel at the bottom of the window, so you can compare the output with what you expected your code to do.
When the main project window opens, you will see a Tip of the Day window, similar to the following screenshot:

I highly recommend that you maintain this tip window while you are processed through the assimilation stage, as it is much easier to learn a few things a day rather than everything all at once. Your internal Borg buffers will overflow otherwise.
With the Borg it is all about efficiency so that assimilation can happen that much quicker.
Each time you create a new project or run a specific file, a new configuration is created so that it is easier to switch between running tests, Rails development, or simply a Ruby program file. Once a configuration is created, it is available in a pull-down menu at the top, as shown in the following screenshot:

When you select a particular configuration, you can then just hit the green arrow button to run or the green button with a bug on it to debug the files in that configuration.
If you want to run a different configuration, just select it from the menu and hit the green arrow. This makes it more efficient to switch between different files or environments.
If you get any errors while running, first check to see that you entered exactly what is in the preceding program. If you still have errors, it might be your Ruby installation and what RubyMine thinks is your Ruby installation. To check that, select the Settings menu item (Mac OS X it is the preferences item in the RubyMine menu, on Windows and Linux it is the Settings command from the File menu).
This is the main window for setting all of the hundreds of attributes of your RubyMine software.
Select the item Ruby SDK and Gems from the left side of this window. You will then be able to select which version of Ruby that you want RubyMine to utilize for your programs.
Once you have selected a version of Ruby, you must then hit the Apply button at the bottom of this window on the right. You can also install a new version of Ruby here and install and manage the Gems needed for your various projects. A Gem is a standard way of distributing libraries of Ruby code for sharing among developers and projects.
While you are at the Settings window, go ahead and explore around and select the various items on the left to see what options are available to you. You are provided with a large number of ways to customize and change how your new assimilated tool will work for you and the common good of the collective.
We will now investigate how to navigate and customize the RubyMine environment, including windows and panel placement, configuration options, tools, and settings.
Assimilation is easier if you are comfortable with your skin.
RubyMine has a wide variety of options and configuration changes that you can make to precisely match your work style. It allows the use of TextMate plugins and even lets you emulate the VIM text editor if you are so inclined to such madness.
Let's start by changing the basic template that comes with RubyMine into an alternate color structure.
To change the colors and fonts by switching themes, follow the steps listed below:
-
Click on the item
 in Settings from the Tools menu. On the left-hand side of the Settings window, there is a setting named Editor.
Click on the gray arrow to open up this setting, as shown in the following screenshot:

Then, click on the Colors and Fonts setting. This window will let you change the overall theme for the entire RubyMine window system.
Click on the default pull-down menu and select the theme Darcula.
Hit OK at the bottom of this window and RubyMine will confirm that you want to change the look and feel of the program.
Select OK in this dialog box and your theme will be set. RubyMine will then ask you to restart the program and you will then be able to see your changes completely. The environment should now look something like this:

All of the settings, colors, fonts, sizes, and so on can be modified through these various settings dialogs and saved as your own custom theme.
We can reset the default colors by selecting the Appearance option in the Settings window. There is a pull-down menu that has default and Darcula in it under the heading of Theme:. The RubyMine environment is made up of various panels that fit together on the screen. You have full control to modify your workspace for easier assimilation. Each panel can be resized, pinned, docked, floating, and split.
The panels all have a common menu that looks like the following screenshot:
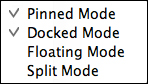
There is a menu item for each of those main controls as follows:
Pinned Mode – If this option is selected, this means that the panel will remain open even if the focus moves away from the panel
Docked Mode – If this option is selected, this means that the panel is part of the entire RubyMine window structure
Floating Mode – If this option is selected, this means that the panel can become its own window completely and moved out of the structure, even into another screen entirely
Split Mode – If this option is selected, it allows for multiple views to occupy the same panel
In order to maximize the screen for writing code specifically, select all of the panels and uncheck the Pinned menu. Now, click on the text window in the center and all of the panels should now be hidden against the main frame of the RubyMine window. There is one more button at the bottom-left corner of the main window that looks like a square. Press that button and even the thick frame will be removed. Now, your screen is ready to construct some serious code.
If you want any of the panels back, you just have to click on the specific panel button on the thick frame to reopen the panel.
Now, we will learn how to utilize RubyMine to manage your Gems and external libraries used for your Ruby on Rails programs.
Start RubyMine and open the HelloWorld project that we created earlier. We will be adding an implant to enhance your assimilation process into the collective.
We will now use a Gem in RubyMine by showing the following simple example using the Prawn Gem:
Right-click on the
HelloWorldproject folder in the left project panel and add a new file to your project. Name itpdf.rb.Add the following code to this new file:
require 'prawn'
Prawn::Document.generate("hello.pdf") do |pdf|
  pdf.font "Courier"
  pdf.stroke_color = "ff0000"
  pdf.line_width = 5
  pdf.stroke do
    pdf.circle([300, 300], 100);
    pdf.circle([350, 320], 20);
    pdf.circle([260, 325], 20);
    pdf.curve [270, 250], [340, 250], :bounds => [[270, 270],[275, 220]]
  end
  pdf.move_down(300)
  pdf.font_size = 36
  pdf.fill_color "000000"
  pdf.draw_text("You will be assimilated!", :at => [40, 40])

  pdf.line_width = 1
  pdf.stroke_color = "0000ff"
  pdf.move_to([0, 0])
  grid = 11
  num_lines = 51
  size = (num_lines - 1) * grid
  pdf.stroke do
    51.times do |idx|
      pdf.line([0, idx*grid], [size, idx*grid])
      pdf.line([idx*grid, 0], [idx*grid, size])
    end
  end
end
Now, right-click on the open source file and select
Run pdf. You should get an error similar to in 'require': cannot load such file -- prawn (LoadError). This means that you do not have the required technology to continue the assimilation process. We need to add some Ruby Gems to allow our program to continue.Open the Settings panel and select the Ruby SDK and Gems panel from the left-hand list. This is where we also changed the version of Ruby that we are using. This panel will allow us to install some specific Ruby Gems that we need.
Hit the button Install Gems... and you will see a screen like the following:

Start typing the name of the Gem you wish to install, which in this case is
prawnand the search will begin immediately. Scroll to the right Gem.Select the Gem in the list at the left-hand side and then hit the button Install. RubyMine will then run the Gem system and install the Gem and all of its appropriate dependencies into your system.
When it is complete, select the prawn gem in the list on the right and you will see the description panel filled with various aspects of the gem for your browsing pleasure.
Once completed, go back and re-run the
pdf.rbprogram.Since this program actually generates a PDF file, we need to find where it saved the file. In the project window on the left, hit the icon that looks like the following:

This will synchronize the files inside the folder with the project list. You should now be able to see the file
hello.pdfin the project window.Double-click on this and you will see this file in whichever application you have on your computer that displays PDF files. You should see something like the following:

The code that we typed in is a simple use of the Prawn Gem. It first requires the Gem code and then starts a block of code that will begin generating the hello.pdf file on the disk. Each command then sets properties of the text, size, colors, circles, and finally draws a grid of lines on the page.
Now it is time to create and run a simple Ruby on Rails application using RubyMine exclusively.
Open RubyMine and navigate to File | New Project. From this window, you can now select what type of project to begin with. RubyMine gives you several options that you can use later. Right now, select Rails application, as shown in the following screenshot:
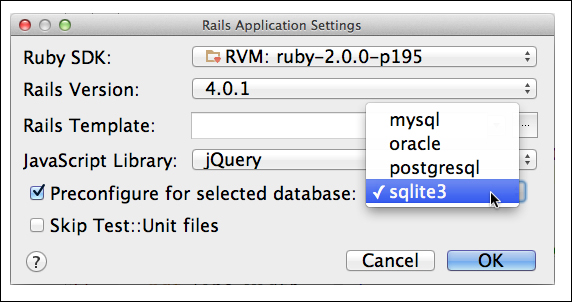
Hit OK and you will see the next settings window which allows you to select which version of Rails you would like to use in your project, along with the JavaScript library and database configurations.
Select the checkbox for Preconfigure for selected database and choose the sqlite3 option, as shown in the following screenshot. Leave the rest as default and hit OK.
Now that you have created a new Rails project, RubyMine takes over and starts using Rails to generate all of the files and configuration necessary for a complete project, including running the command bundle install at the end. This will make sure that you have all the proper Gems installed for your Rails project.
Now, we can run what we have and see that everything is installed correctly, using the following steps:
At the top of the window, select the green arrow to run the Development: Progeny configuration. Running, in this case, means that it will start the default Rails webserver, Webrick, and begin listening on port 3000 for web browser requests.
Once it is running, open your favorite browser and go to the address
http://localhost:3000, and you should see the opening Rails Welcome Aboard screen.Click on the link About your application's environment, you can see some details about your installation including the various version numbers of Rails and Ruby, and the database that your application will be using.
Now, we can build some features for our app. Let's begin by creating an interface to our database of species that we have already assimilated. For this, we can use the Rails generators to build the scaffolding of our application that gives us something to build on.
All of the functionalities of Rails can be accessed from within the RubyMine environment, as shown in the following steps, so it is not necessary to go out to a command window at all:
To run the generators, we just need to navigate to Tools | Run Rails Generator.
As you type, the list is filtered to match your selection. Select the scaffold generator and hit Return:

The following window gives us the opportunity to name our table and the various fields that it will contain. The database table will become the name of our model as well.
Type the following into the top text box:
Species name:string identification:integer assimilated:Boolean
Leave the other settings at their default and hit OK, as shown in the following screenshot:

Now if you reload your browser window, you should see an error like
ActiveRecord:: PendingMigrationError.Oops! We forgot to do something after creating the code for the database tables. We need to run the migrations that will create the actual tables.
Navigate to Tools | Run Rake Task… and start typing
db:migrate. Just like the generator window, the various rake tasks will begin to be filtered by what you type.Hit Return and then select the defaults in the next window Latest migration and the migrations will be run for you.
Now that the tables are created, point your browser to a new location,
http://localhost:3000/species. You will see the index page for yourSpeciesdatabase table, similar to the following screenshot:
Click on the links and add some species to your database. The scaffolding that we generated, produced all of the CRUD (Create Read Update Delete) forms and screens necessary for managing our
Speciesdatabase table, without typing any commands in our terminal or leaving RubyMine at all.
Of course it has no style, but who cares about style? We are the Borg and only care about technology!
Ok. Maybe we can spruce it up a little bit. Lets add a Gem called Bourbon that helps with the following:
Open the Gemfile from the project window and add the following line to it:
gem 'bourbon'
Now we need to install the Gem by running
bundle install. We can do this directly from RubyMine by navigating to Tools | Bundler | Install.Hit the Install button on the window that shows and the Gem will be installed correctly.
Now we can edit the CSS file that is in the
App/Assetsfolder calledspecies.css.scss. Open this file and add the following CSS code to the file:@import "bourbon"; p { @include linear-gradient(to top, white, steelblue); }Reload the page that shows one of the species that you created such as
http://localhost:3000/species/1,as shown in the following screenshot. Now isn't that much better?
This recipe covers how to debug your Rails application including watching variables, program stack, and breakpoints.
Although the Borg are perfect, sometimes it is necessary to find problems in our code. To do this, we need to be running the debug version of our code.
Now we get the chance to debug our project, so let's begin. First, select the configuration for development—Progeny just like we were going to run the server:
-
Then hit the green debug (bug) icon
 to the right of the green run arrow.
If you have never debugged a Rails application, RubyMine will detect that you are missing some Gems and ask if you want to install what is necessary to continue debugging. Hit the YES button and RubyMine will begin installing the gems.
Your application will now be ready to initiate a debugging session. The server is already running, but we can set a breakpoint anywhere in the Rails program to inspect what is going on at a deep level.
In the
Controllersfolder within theappfolder, open the filespecies_controller.rband set a breakpoint on the line 27. This is done by simply clicking on the line right next to the number 7 like this:
Now we need to get the application to execute this part of the code. Since this is the
Createmethod, it means that we must be in the process of creating a newSpeciesrecord in our table.Click on the New Species link in the browser or go to the link
http://localhost:3000/species/new.This brings up the form that allows you to enter the values for the table.
Enter some values such as
Humanfor the name,5618for the identification,and check the assimilated checkbox.Select the Create Species button, RubyMine will be brought to the front window and you will see a screen that looks like the following:

The bottom of the screen is divided into three panels: The stack Frames on the left, the available variables in the middle, and the Watches panel on the right.
The Frames panel lets you look at the various program threads as well as the stack frames for each thread. This can be very useful to determine the context in which your breakpoint was called.
Change the frame and go up to see which method was called before the current method. As you change frames, you will see the variables change along with it, showing you the local variables available in that particular stack frame.
Change the frame back to the
createmethod so that we can continue.The middle panel is where you can inspect variables as you step through the lines of code.
Select the little arrow next to the
paramsvariable in the center panel. It should look similar to the following screenshot:
Select the little arrow next to the
speciesvariable that is inside theparamsvariable; you will see the three variables from the HTML form that were sent to the server.Right-click on the
@speciesvariable and select the Add to Watches menu. This variable will now be shown in the Watches panel on the right.Now move through the code and let's watch this variable change.
There are five buttons that control the execution of the program in the debugger, as shown in the following screenshot:

In order from left to right they are: step over, step into, force step into, step out, and run to cursor. The most used is the step over button which we will click now. Once clicked, notice that the
@speciesinstance variable in the Watches window is no longer nil, but has a value.Open the variable in the Watches window.
Scroll down to find the
@attributesvariable and open that by clicking on the gray arrow. You will see the various properties of the actual@speciesobject that contains the same values from theparamshash that were sent to the form. These were put into place by theSpecies.newcode that we just stepped over.Notice that the
created_atandmodified_atproperties of this variable are still nil. This is because the new object that we created has not yet been saved.Click on the line 30 of the previous source file of the debugger windows which has the code:
if @species.save.Click on the debug button Run to Cursor. The program will continue executing until it gets to this line.
Now, press the button to step over and the
@species.savecommand will be executed. If the saving operation worked without error, then the program should now be on the line 31.Look at the
@speciesvariable in the Watches window and you will see that the two date properties will now be filled in with the current date and time.To continue normal operations, you can hit the green arrow on the left-hand side of the debugging windows and the program will continue to execute.
There are so many different options that we can control while debugging and too many to cover in this small book. We can even add conditions to our breakpoints. There are some other windows that we can take advantage of while debugging, which are very useful. The right-most button in the debug controls, Evaluate Expression, allows us to execute any Ruby expression and inspect variables at the same time.
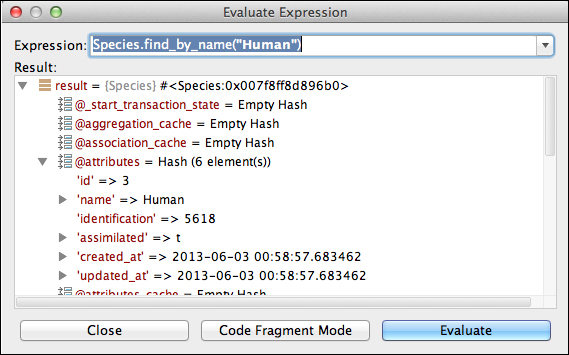
Add a breakpoint to the line 7 of the species_controller.rb file and display the URL, http://localhost:3000/species. When the debugger comes to the front, hit the Evaluate Expression button. This will bring up a window that lets us add some code. Add the following code to the top input box:
Species.find_by_name("Human")Hit the Evaluate button at the bottom of the window and you should now see the results in the window, along with arrow navigation to expand and contract the various elements of this variable, as shown in the following screenshot:
This recipe will show you how to start the Rails console and inspect your code and database interactively.
RubyMine allows you to run both the Interactive RuBy (IRB) console as well as the Ruby on Rails console. They both run in an interactive window at the bottom of your editor much like the debugger and output windows. Perform the following steps:
On the Tools menu, select Run Rails Console and RubyMine will ask you which environment you would like to load into the console. This lets you inspect/change your debug, test, or production environments directly. The default option gives the development environment.
Select OK and the console will open.
The Rails console prompt
>>means that it is ready for input from the keyboard.Type
2 + 2and hit Return. The result should be4as you can see in the following screenshot. This is just like the IRB console, in that you can type Ruby expressions and they will be evaluated interactively.
Let's perform some database lookups using Rails syntax.
The proper syntax for Rails 4.0 is something like the following, which you can type in and see the result:
Species.where(assimilated: true).load
The result will be something like this:
  Species Load (0.2ms)  SELECT "species".* FROM "species" WHERE "species"."assimilated" = 't'
#<ActiveRecord::Relation [#<Species id: 3, name: "Human", identification: 5618, assimilated: true, created_at: "2013-06-03 00:58:57", updated_at: "2013-06-03 00:58:57">]>
We can see that the console returned an array of Species objects that matched that query. It even showed us the SQL query that was used to get the data directly from the database.
There are many wonderful tutorials and tricks online that we can make use of to learn more about the console, starting with the official Rails Guides: http://guides.rubyonrails.org/.
Testing your application is an important and often overlooked aspect of writing good code. This recipe will show how to write some tests for your application using the minitest-reporters Gem and run the tests interactively. This will give you an overview of using tests to make your application much more robust. In addition, we will explore the use of fixtures to create some reliable test data as input for your tests.
In order to use the built-in testing tools inside of RubyMine, there is one Gem that we need to install first, which can be done using the following steps:
Add the following line to your Gemfile:
gem 'minitest-reporters'
Navigate to Tools | Bundler | Install and the Gem will be installed and added to your project.
Now, we need to decide what our test will be, which can be done using the following steps. When we ran the Rails generators to create our first Species table in the recipe, Creating your first progeny (Should know), Rails also created some pre-made testing files for us automatically. These are all stored in the folder called Test.
Expand this folder in the Project window and you will find a file called
test_helper.rb.Open this file and add the following lines to the top of the file:
require 'minitest/reporters'
MiniTest::Reporters.use!
Add the previous lines right below the third line, which should be something like this:
require 'rails/test_help'
Save the file and then expand the
Modelsfolder.Open the file contained inside called
species_test.rb,which was automatically generated from the scaffold generators for us.Replace the following three commented-out lines:
  # test "the truth" do
  #   assert true
  # end
Replace the previous code with the following testing code:
  test 'Full Species Assimilation' do
    @species = species(:not_assimilated)
    assert_equal @species.full_species, "Human 1 has not been assimilated.", 'Full Species Not Assimilated incorrect'

    @species = species(:assimilated)
    assert_equal @species.full_species, "Human 1 has been assimilated.", 'Full Species Assimilated incorrect'
  end
One more thing we need that these tests rely on is a file called fixture. Fixtures are a way of defining the data that is necessary for a particular database record that can be loaded before each test to populate databases. This is shown in the following steps:
Expand the folder inside the
testfolder calledfixtures.Open the file contained within called
species.yml.Replace the text in this file with the following code:
assimilated:
  name: Human
  identification: 1
  assimilated: true
  notes: Only partially assimilated

not_assimilated:
  name: El-Aurian
  identification: 1
  assimilated: false
  notes: Guinan's Species
Now, in order to run the tests, we need to run another rake task specially designed for these types of tests. Perform the following steps to do so:
Right-click (ctrl + click on Mac) on the word
Speciesin the following code line in thespecies_test.rbfile in RubyMine.class SpeciesTest < ActiveSupport::TestCase
This will bring up a menu that will let you run the tests for this module, as shown in the following screenshot:

If everything has gone correctly, you should see tests running in the bottom panels, as shown in the following screenshot:

The undefined method error is expected since we have not yet written the code for that. Perform the following steps for writing this code:
Open the file from the
appfolder, themodelsfolder, and the file calledspecies.rb. This looks like a good place to add our model-level method calledfull_species. That method is written for you in the following step.Copy and paste the following code into this file, replacing the code that is there:
class Species < ActiveRecord::Base
  def full_species
    "#{name} #{identification} has #{(assimilated? ? '' : 'not')} been assimilated."
  end
end
This is a simple method designed to merely combine some of the database fields into a common sentence that might be used in several Rails views across the application.
Now that we have a method in place, lets re-run the tests as before. This time we can use the configuration pull-down menu at the top of the IDE and just hit the green arrow next to the menu to re-run the same tests. Unfortunately, we still have an error in our code. You will see a long red bar above the testing windows as well as an error message like the following:
MiniTest::Assertion: Full Species Assimilated incorrect.
--- expected
+++ actual
@@ -1 +1 @@
-"Human 1 has been assimilated."
+"Human 1 has been assimilated."
We can tell by the last two lines that we have an extra space where not might be shown depending on assimilation. Let's fix that now using the following steps:
Replace the line in the
species.rbmodel file:"#{name} #{identification} has #{(assimilated? ? '' : 'not')} been assimilated."with this:
"#{name} #{identification} has#{(assimilated? ? ' ' : ' not ')}been assimilated."Re-run the tests and we should now see a green bar and all tests passing successfully.
These tests are assuming that we have a Species method in Model called full_species. This method was written after the test was written This is called Test Driven Development (TDD) where the tests are written first and the methods to satisfy the tests come later.
This allows the developer to think about how someone would use a method in the rest of the code, which is basically writing the interface to the method first.
The testing program that we wrote is a simple assertion type test that compares two strings to see if they are equal. We defined the method to return a string, so we hard code a string that we expect and compare it with the returned string from our full_species method.
The line in the test @species = species(:not_assimilated) reads the species.yml file from the fixtures folder and creates a temporary species database model with the attributes from the .yaml file. This lets us test the various attributes of our model with a standard set of testing data that does not change from test to test.
There is nothing worse than losing code that you have spent eons writing. RubyMine has some nice built-in tools to manage your version control systems including Subversion and GIT repositories.
Open your Progeny Rails project in RubyMine.
Depending on your OS, download and install Subversion and GIT as follows:
For the Mac OS, subversion is already installed on the Mac OS X versions.
Git can be installed by downloading the installer for your version of OS X. The images can be found at https://code.google.com/p/git-osx-installer/.
Follow the instructions for the installer.
For Windows, Subversion can be downloaded and installed by running the appropriate installer for your system from http://tortoisesvn.net/downloads.html.
Git can be installed through the installer http://msysgit.github.io/.
Follow the instructions for the installer.
For Linux OS, subversion can be installed by opening a terminal window and typing:
sudo apt-get install subversionGit can be installed by typing the following command in a terminal window:
sudo apt-get install git
Now that we have subversion and Git installed, we can tell RubyMine which version control system that we want to use for our project. Let's start with Git:
Navigate to VCS | Enable Version Control System...
This will bring up a little window that will let us choose which VCS to use for this particular project. We can have different VCSs for each project that we have in RubyMine, as shown in the following screenshot:

Select OK. This will initiate the Git system and automatically issue the command
git initon your project.Expand some folders. You will see that all of the files are now color coded in red. This means that the files are not yet under version control, so we need to add them to our local Git repository. This takes two steps: Adding the files and committing the files.
To add the entire project, click on the frame panel button at the bottom of the project called 9: Changes.
Click on the link Click to Browse which is next to Unversioned Files. A new window will open with a list of files in the project.
Select the top-level folder and hit the green + button on the left of this window. This will add all of the files and folders to the project under the Git staging system. As shown in the following screenshot, the project window will now show all the files with a green color, which means the files are added to the local Git repository, but they have not yet been committed:

Now all we need to do is commit the directory using the following steps:
Right-click on the
projectfolder in the project list and navigate to Git | Commit Folder. This will bring up a window like the following:
From this window, we can select many options, but the most important is to add a comment in the bottom text box. This comment will follow this commit forever.
Type
Initial Project Commitin this box.Hit the button Commit in the bottom-right corner. This will add the files to the Git repository and we can now see that all the files have returned to a black color in the project window. This means that all the files are now under version control. If we make a change to a file, the color will change appropriately. From now on, we can add single files and commit them either individually or as a group, just like the initial commit.
Now let's see how to view changes from different files versus our committed repository changes:
Add the following comment line to our
species.rbfile from app | models above the method that we created earlier:# Return a status string of a particular species
Save the file.
Right-click on the opened file and navigate to Git | Compare with Latest Repository Version. This will show us a window with both versions of the file shown next to each other with insertion and deletions from both versions to show exactly what is different between the two files, as you can see in the following screenshot:

The subversion and other version control systems that RubyMine integrates with are basically the same in operation. Explore the subversion system or any other VCS systems that you might be familiar with. Just remember to use one of them to maintain your legacy and not lose your best work.
There are many more controls that you can use with your VCS including comparing full directories, pushing your changes to a remote repository, creating patches, viewing and creating branches, and even integration with GitHub. Feel free to explore all these options on your own.
Once we have written our code, good developers continue to refine that code using techniques called refactoring. RubyMine has some excellent tools to help us with that task. In addition, there are database, method, and class viewers and hierarchies. These tools can also help us in locating duplicate code and variables using advanced searching techniques.
We will begin with how to refactor some code into a method:
Open the
helloworld.rbfile from the project window on the left. We will need to fix a bug in the code first and then we will refactor some of the code into a method that we can reuse later.On the line 24 change the following:
51.times do |idx|
Change the preceding line to the following:
num_lines.times do |idx|
Now we can select a portion of code that lends itself to being refactored to improve our tech:
Select the following entire block of code using your mouse:
  pdf.stroke do
    num_lines.times do |idx|
      pdf.line([0, idx*grid], [size, idx*grid])
      pdf.line([idx*grid, 0], [idx*grid, size])
    end
  end
Click on the Refactor This menu item from Refactor. This will bring up a menu like the following:

Select #6 Method… and a window will be shown that will let us choose the method name and order of parameters that will be passed to the method, as shown in the following screenshot. RubyMine automatically determines which parameters are needed to complete the code.
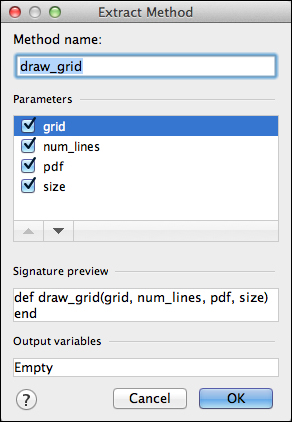
Enter the method name
draw_grid.Hit OK.
RubyMine will now create a method with the selected code and insert a call to the new method
draw_grid. The method is placed at the top of the code and should look like the following code:def draw_grid(grid, num_lines, pdf, size) pdf.stroke do num_lines.times do |idx| pdf.line([0, idx*grid], [size, idx*grid]) pdf.line([idx*grid, 0], [idx*grid, size]) end end endThe method call then looks like the following:
draw_grid(grid, num_lines, pdf, size)
Now lets try renaming a variable. Click on one of the variables named
num_lines.Right-click and navigate to Refactor | Rename.
Begin typing a new name for this variable,
number_of_lines.Notice that the variables throughout the file are changed as you type.
If that doesn't get your Borg juices flowing, then you are just not worth assimilating.
Another form of refactoring is just the reverse of the extract method which is called inlining. RubyMine will basically remove the method and put the code back inline with the rest of the code, eliminating a method that might only be used once, for instance.
In addition, RubyMine allows you to create variables from hard-coded values, extract constants, modules, classes—just about anything that you can imagine.
RubyMine can also show us some common errors that can creep into our projects by running an inspection on our codebase and analyzing against some known code style issues. Not all of the issues are errors, but merely coding style items that are brought to our attention.
Select the Inspect Code menu item from Code and the code will be analyzed and a panel opened similar to the one in the following screenshot. Notice that it finds double-quoted strings where they are not needed and some semicolons at the end of statements that are unnecessary. Ruby has no problem with these issues, but having semicolons are based on some old "tech" that has leaked into our assimilation process that we need to surgically remove. This can be done by simply removing the semicolons and rerunning the code inspection. This is very useful when looking at larger code bases like an entire Rails application.

In this recipe, we will begin using the code coverage Gem with the built-in RubyMine tools to enhance your testing regimen and make your code even more robust.
We first need to add the Gem simplecov to our Gemfile using the following steps:
Open this Gemfile and add the following line:
gem 'simplecov', :require => false, :group => :test
Navigate to Tools | Bunder | Install.
Now, all we have to do is to run our comprehensive set of tests that we created earlier using the coverage option:
-
Select the rake test configuration and then hit the button that looks like "Run 'test' with Coverage"
 .
.
If you followed the other recipes, then you probably got seven errors in your tests. Oops! Remember that the Borg are only seeking perfection, we have not yet arrived! We need to add some text fixtures that we removed earlier using the following steps:
Open the
test/fixtures/species.ymlfile and add back the following fixtures:one: name: MyString identification: 1 assimilated: false two: name: MyString identification: 1 assimilated: false
Rerun the test with the coverage option and all of our tests should pass. A new panel will open on the right that has the results of our coverage, as shown in the following screenshot:

This shows that we don't have many of our lines of code actually tested. Let's generate a report, so we can see more detail:
Click on the Generate Coverage Report icon which looks like a square with a green arrow point up.
The next window will ask you where you want to save the file and gives the option of opening the resulting report in your browser.
Select this option and hit Save.
Your browser should now open with a report in which you can click on each line and get actual details of which lines of code have not been tested or executed:

Click on the file
app/controllers/species_controller.rb.You will then get a screen like the following, which shows much more detail about exactly which lines were not tested.
The lines in green are tested and they show a little number on the right in a black circle that tells how many times that line of code was executed during the tests. The light red lines show which code has not been executed at all and are ripe for a new test to be written, so we can aspire to 100 percent code coverage:

Now you, the new RubyMine drone, can begin to write the missing tests and continue until you are a perfect 100 percent code coverage expert.
If you would like to read more information on SimpleCov, you can find it at https://github.com/colszowka/simplecov.
RubyMine has more tools that let us manage all aspects of our programming projects. This recipe will concentrate on configuring and using the built-in database tools in RubyMine.
Open your Progeny Rails project that we created earlier in RubyMine.
When the project opens, there will likely be a window that comes open like the following:
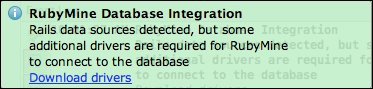
Click on the link and RubyMine will download and install some Java database drivers so that it can access your Sqlite database (or whichever you are using) from your existing Rails project.
Directly accessing your database fields and structure is much more efficient when we have a nice tool to list and modify our records. RubyMine has the ability to show the tables from your environment directly in the interface, so there is no need to open another tool. Perform the following steps for monitoring your extremities:
Click on the Database button on the left side of the RubyMine main frame. This will open a panel that looks like the following:

Click on the panel and then use the command code as described in the window. (This will be different for each operating system).
Select the menu item Import from sources … and then hit OK from the next window.
Click on the table that shows and open up each level.
Double-click on the
idelement of theSpeciestable and we will see a window like the following:
This allows us to view, add, modify, and delete records from our tables easily.
Click on the + icon, we will then be able to manually add another record to our database.
If we double-click on one of the cells, we can modify the values that are stored in the database. This is a quick way to edit some mistakes that we made when entering data or to test out a part of our interface. Let's add another record via the table editor.
Click on the + icon and enter the following information into the cells of the new blank row that is created:

Now we have two species in our database. We can edit these items as we please, but please note that updates do not automatically change the
updated_atfield. This is done through the Rails system as it saves a record and we are bypassing that framework completely using this system. We are talking directly to the database.RubyMine also gives us a nice interface to perform direct database queries on our data tables directly.
Open the database console by hitting the icon Database Console at the top of the Database panel. This opens a window in the main editor panel that lets us type SQL queries directly and execute them to get a dataset back, as you can see in the following screenshot:
Type the following in the console window:
select * from species where assimilated = 'f'Select the green arrow button right above the text in the editor panel. Don't select the green arrow which runs a specific configuration.
The results of this direct query will now show at the bottom in a new panel with a database table editor like we had before. It will look something like the following screenshot:

We selected all of the species in our table that have not yet been assimilated. We can now remedy that easily.
Double click on the f letter in the assimilated column.
Change that to
t.
See how easy it is to assimilate other species?
Notice that when you changed the field, it disappeared. This is because our query was executed again and found no more species left to assimilate in our database table. Our job is done. We can return to the collective.
We will now venture into configuring and using the built-in deployment tools in RubyMine. This is the final step in completing your journey through assimilation and ensures the survival of your species. Deployment can be done in many different ways, but we only have time to explore one.
Open your Progeny Rails project that we created earlier in RubyMine. Make sure that you have a remote location that will accept a Ruby on Rails project and allows SFTP uploading to this site.
RubyMine can interface directly with a remote server and upload/download files to this site, keeping the files in sync automatically. It also has built-in support for the Capistrano deployment Gem to help with this process of remotely deploying and restarting Rails apps.
It is best practice to use our version control system to deploy our application. It is also easiest if we utilize one of the services out on the Internet to house our repository for us during this process. We will add our existing Git repository that we created in the recipe, Ensuring your legacy (Become an expert), to the GitHub system at http://github.com using the following steps:
Navigate to VCS | Import into Version Control | Share Project on GitHub.
This will bring up a window asking for your GitHub account and giving you the opportunity to create one if you don't have one, as you can see in the following screenshot. GitHub is free if you keep your project public and open source, but they also have paid options if that is unappealing to you.

After you log in with a valid account, the next window that appears will be for you to name your project and give it a short description. Doing this will create the remote repository on GitHub for us to use later.
If we now log in to the GitHub account and navigate to your project, you can copy the Git repository URL, as you can see in the following screenshot, which we can add to our
deploy.rbfile for use in Capistrano:
Now, we need to install the Capistrano Gem by adding it to our Gemfile as we have done before, except this time Rails knows that this is a common Gem, so we just need to uncomment out the line in the Gemfile like the following:
# Use Capistrano for deployment
 gem 'capistrano', group: :development
Navigate to Tools | Bundle | Install.
Now we can use RubyMine tools to start the Capistrano process. We must first navigate to Tools | Capistrano | Capify Application.
This will create two files:
Capfileandconfig/deploy.rb.Open the
Capfilefile and uncomment out the following line so that the process will run the precompilation of the assets pipeline after deploying the files to your webserver:load 'deploy/assets'
Open the
config/deploy.rbfile and edit the following lines using the GitHub repository URL that you copied from your account for the:repositoryline:require 'capistrano-deploy' set :application, "progeny" set :repository, "https://github.com/lockersoft/Progeny.git" set :user, "lockersoft"
Of course, you would use your own specific information for the server where you are going to deploy your application. There are many different options that you can use from Capistrano to customize your deployment to meet a variety of needs for your particular collective. Too many to show here, so start by looking at the Capistrano Gem documentation found at https://github.com/capistrano/capistrano.
Once we have our
deploy.rbfile the way we want it, we can commit our changes and push those changes to the GitHub remote repository that we created earlier. Navigate to VCS | Commit Changes.This will bring up a window that we saw earlier where we can add a message to our commit. At the bottom of the window, instead of selecting Commit, we want to select the option Commit and Push...:

This will bring one final window which allows us to choose a different branch. Just hit the Push button and our project will be uploaded to the GitHub repository.
Now, we are ready to deploy the project. We will let Capistrano do that for us by merely running that script. Navigate to Tools | Capistrano | Run Capistrano, which will bring a window to allow us to select one of many tasks to run. The first one we want to run is the
deploy:setupcommand. This runs much like the rake tasks and once we select and run a task, it is saved in our task configuration menu at the top of the main project for later use, as shown in the following screenshot:
This will create the directory structure that Capistrano needs on your remote server for us.
The next Capistrano command is selected from the same menu, but it is simply deploy. This will actually issue a command on the remote server to clone our Git repository from GitHub into our remote server directory and we will now be ready to access our server.
If everything is right in our
deploy.rbscript, which is saying a lot, then the Rails server will be running on our remote server and we can simply connect to the server via a browser like one of our users would.
Now, whenever we need to make a change to our application, we just have to follow the following steps in order to deploy those changes:
Commit and push our changes to the remote GitHub account
Run the Capistrano deploy task
Check the server with our browser to make sure everything is working as we expect
We have now successfully deployed our application, which in turn can spawn new drones in our quest for perfection for our entire collective.
There are many video tutorials that I have created from my lectures in teaching Ruby, Ruby on Rails, Mobile Development, Java and Android Development, and even PHP development on my YouTube channel. For lectures on all of these, I use the Jetbrains tools such as RubyMine, PHPStorm, and IntelliJ. Check them out at http://youtube.com/lockersoft.
In addition, some of the source code examples and code from my other lectures can be found on my GitHub account at https://github.com/lockersoft.


