"Self-education is, I firmly believe, the only kind of education there is." | ||
| --Isaac Asimov | ||
In this book, we will simulate my personal experience of testing e-commerce systems. We will start by writing a very simple and crude test case, and we will refactor it and grow it into a stable and reliable test suite. A web store example might not apply to everyone's job, but the examples provided should be general enough to apply to any situation.
Today is our first day on the job; you and I are the sole members of the newly formed Quality Assurance team for the little start-up that sells Valentine's Day cards. It's a small company and the pay is not the greatest; however, just like any small start up, we get some company stock. This means that we can be very rich and famous if the website becomes popular. The website needs to stay operational and bug free, or our customers will never return and I will not be able to purchase that yacht I always wanted.
We know that we are short-staffed and need some automated tests to keep the quality high. However, first we need to convince the owner of the company that test automation is the right direction, instead of just testing everything by hand. We need to provide a cost-effective way to test the website and get quick results!
In this chapter, we will make an argument for using Selenium as our automation tool of choice and write a simple test to show how fast we can start building new tests. We will discuss the following topics along the way:
Why you should use Selenium over other tools
The Record and Playback pattern
The Selenium IDE
Recording a test with the Selenium IDE
Selenium WebDriver
Writing a test with Ruby
The Test::Unit testing framework
Interactive test debugging
There are several reasons to use Selenium over other test automation tools out there:
It is the right tool for the right job
It is free of cost
It is open source
It is highly flexible
Selenium is a great tool for testing web applications and interacting with the application like a real user would. It uses a real browser to click, type, and fill out forms. It is as close to a human user as you can get. It's the perfect tool for testing the flow of the web application from start to finish.
Nothing can beat the free price tag! While there are other commercial products that have more advanced features available for purchase, they tend to run into tens of thousands of dollars per license. Selenium is so cheap that you will be able to finish this book and build a whole test suite without spending another dollar.
Tip
As old anti-proverb states: there is no free lunch, but there is always more cheese in the mousetrap. A free tool does not mean that the tests will write themselves for free; there will always be expenditure on someone's time. By following good practices, we will not be able to eliminate this cost but will try to reduce it as much as possible in the long run.
Selenium is Open source software (OSS), but this means more than "it is free". As with other OSS, with Selenium, you don't just get the product but you get a whole community; you become part of the family. The majority of Selenium developers cannot wait to help someone who is in need, or to share some really great workaround for a difficult problem they ran into. This sure beats paying for expensive and underwhelming technical support you get with a commercial product.
Selenium is incredibly flexible; because it is Java-based, you can run it on most operating systems or browsers. You can even use it to test iOS and Android browsers. On top of that, you can run it in "headless mode" with an emulation browser, or set up a grid to increase your capacity, but we will cover more on these topics later in the book.
Let's start with the very first test development pattern: the Record and Playback pattern. This is the starting point with majority of Selenium and other automated user interface testing tools. The idea behind this approach of test development is to allow the user to record their normal testing activities and play them back through the testing tool at a later date.
Having a tool record our interaction with the application has several advantages; chief among them is the speed at which we can grow our test suite. Let's take a look at individual advantages:
Fast test growth: This is the biggest selling point in most commercial tools available. A user is able to record new individual tests as fast as he or she can click on links. A large test suite can be created in hours instead of weeks.
No previous experience: It does not require any experience with programming language, just click on the record button and click around. Let the tool write the actual test code.
Element lookup: It is incredibly easy and useful, and there is no need to look at the page source to find the button by hand. Just click on record, click on the desired button, and the element location is recorded in the test for you.
The commercial testing tools will give you a very large list of great features, which may sound too good to be true. In actuality, these features probably are too good to be true; every recording tool has these and many more disadvantages:
Bad locators: These are a common problem with recording tools. Often a tool will record the absolute path to an element. If the desired button shifts left or right on the page, the playback of the test might fail even though the application works perfectly fine.
Inflexible tests: These are the only output from recording tools. Since the playback is identical to the recording process, the final result is an identical copy of the recording. However, what if a test needs to register a new unique user for each run? To accommodate this task, it often takes more time than to write the test by hand in a programming language.
Hardcoded test data: It is a big problem if your tests need to be flexible and use different data depending on the environment. We will discuss test data in Chapter 4, Data-driven Testing.
Poorly written tests: Just like many WYSWYG tools available for writing code, the task of creating something is simple. However, the maintenance becomes incredibly difficult, as variable names and method names might be poorly named or strangely nested within each other.
Duplicate code: It is one of the examples of poorly written tests. Most recording tools are not intelligent enough to detect duplicate steps and will not reuse existing code. See the The DRY testing pattern section in Chapter 3, Refactoring Tests.
Now, let's get our hands dirty! We will be playing with Selenium Interactive Development Environment (Selenium IDE or simply IDE) in this section. IDE is one of the greatest starting points for the Selenium project. It allows someone who has never programmed in his or her life to record a useful test in a matter of minutes and start adding new tests to the test suite in no time.
Selenium IDE is a browser plugin that only works in Firefox browser. It is easy to install and integrates well with the functionality of the browser. Use these easy-to-follow steps to install the IDE in the browser:
In your Firefox browser, navigate to the Selenium website at http://seleniumhq.org:

Click on the Download Selenium link on the home page shown:

In the Selenium IDE section on the Download page, click on the link for the latest released version, as shown here:

Allow Selenium to be installed on your computer by clicking on Allow on the following permission dialog:

The following dialog will show you all of the Selenium IDE components that will be installed on your browser. Click on Install Now when it becomes clickable after several seconds. The installation dialog is shown in the following screenshot:

Restart Firefox.
Now that the plugins have been installed, you should see a little icon in the browser:

Clicking on that button will reveal the Selenium IDE window, as shown in the following screenshot:

Just like many commercial testing tools, the Selenium IDE supports the Record-Playback style of writing tests. The IDE monitors your browser and notes down any actions that you perform. By compiling a list of actions, a test slowly emerges. Let's start recording our first test by following these steps:
Open the Selenium IDE in the Firefox browser and make sure the recording mode is on, as shown in following screenshot:

In a new tab, navigate to http://awful-valentine.com, as shown in the following screenshot:

Click on the search text field and type in
cheesein the search bar and click on the submit button. The following screenshot shows the search box and the submit button:
As we are performing these actions, the IDE is recording all of them in the background. We can inspect all of the recorded actions in the IDE window, as shown in the following screenshot:

Let's walk through the table inside the IDE window to get a better understanding of each item.
The table has three columns in it:
The first column is Command. This is where the action of the command is defined, such as a
clickortype.The second column is Target, where the command will be performed.
Finally, the third column is Value. This section is only used when the target element, such as a text field, needs some text inserted into it.
We have our simple script now; let's save it so we can reuse it later.
Our next step is to save the test run to a file:
Click on the File option:

Choose Save Test Case.
Name the file
search_test.htmland save it.
Notice that we saved the test as an HTML file. This is because Selenese, the language that the IDE uses to record and playback tests, is just an HTML table. You can even open the search_test.html file in your web browser and see how it looks! In the following screenshot, we have Selenium IDE and the saved test opens side by side for easy comparison:

Right away, you can see that the IDE (on the left) and the saved Selenese output displayed in a web browser (on the right) look extremely similar.
In this section, we will walk through the saved test from the IDE, which is written in a language called Selenese. We will then compare the Selenese commands to the commands written in a real programming language.
Note
The code and the step-by-step instructions on how to test it on Windows and other operating systems can be found at https://github.com/dimacus/SeleniumBestPracticesBook.
If you ever see the HTML source code of any web page, Selenese will not be a new concept for you. Selenese can simply be described as an HTML table with a table row as a test command. Let's take a closer look at it. Open the search_test.html file in your editor of choice. The whole test should look like this:

We will ignore the first five lines of the code, as it has no practical application for us at this point. On line 6, you will find the following code:

The preceding line declares the base domain URL for our tests.
Note
One of the biggest weaknesses in Selenium 1 (RC) is that it was written in JavaScript, which exposes security issues with third-party domains running arbitrary JavaScript code on any website. The security experts implemented strict rules to prevent Cross-Site Scripting (XSS). Thus, Selenium IDE and RC will not be able to test multiple websites in a single test run.
Our next section of interest is the code on lines 14 to 18, where a single table row (tr) contains our first command in three table data (td) sections. Test lines 14 to 18 are shown here:

The first TD matches the Command column in the IDE, and in this case the command is to open a given URL.
The second TD matches the Target column in the IDE and is telling the test to open the root of the base URL from line 6.
Let's look at the commands we just learned in the IDE and Selenese and how they translate into the Ruby language. In the case of Ruby, we will only look at the key commands and how they translate from Selenese into Ruby. The goal of this exercise is to take away some of the intimidation factor of moving to a programming language for someone who may never have seen software code before.
To start, let's look back at the HTML table that is the Selenese output:

The first line in this table is the name of the test, which happens to be search_test.
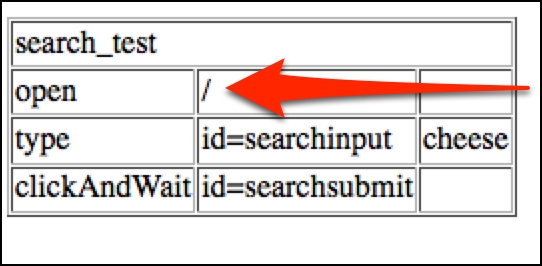
The second item, shown in the preceding screenshot is the open command to the root (/) of the base domain URL. So, the browser will navigate to this exact address http://awful-valentine.com/.
Tip
Downloading the example code
You can download the example code files for all Packt books you have purchased from your account at http://www.packtpub.com. If you purchased this book elsewhere, you can visit http://www.packtpub.com/support and register to have the files e-mailed directly to you.
In Ruby, the open command translates into a very straightforward get method call. The code looks like this:
selenium.get("http://awful-valentine.com/")Tip
Note that we didn't have to use base URL like we did with Selenese. WebDriver talks directly to the web browser, not through JavaScript; this eliminates XSS limitations, and you can test as many websites as you want in a single test run.
Once the browser navigates to the website we want, it needs to locate the search field and input the search term. In the search_test table, it is in the third line:

Since this is a complex multistep action, let's break it down into smaller chunks:
Find the text field element with the help of the
find_elementmethod by passing it the HTML ID of the text field (searchInput), and then store the element in the element variable:element = selenium.find_element(:id, "searchInput")
Once the text field is located and stored in the
elementvariable, we will type thecheesestring into it by using thesend_keysmethod:element.send_keys("cheese")We have now typed the text we wanted into the search bar. We used the
elementvariable to store the reference to the text field, and then applied some typing action on that variable.We can use method chaining to get the same result in a more condensed version; the search and type text action would look like the following code with method chaining:
selenium.find_element(:id, "searchInput").send_keys("cheese")
Note
Method chaining is a common type of syntax that allows the programmer to invoke multiple method calls without using intermittent variables. Each method call in the chain returns an object that answers to the next method call in the chain. We will go deeper into object-oriented programming in the The Page Objects pattern section of Chapter 7, The Page Objects Pattern.
The last action our test performs is clicking on the search submit button. In the Selenese table, it is the fourth row of our test:

Using method chaining as before, we will find the submit button and send a
clickcommand to it:selenium.find_element(:id, "searchsubmit").click
The clickAndWait command translates to a simple click method call in Ruby.
Note
Notice that with Selenium WebDriver, the wait for page to load part of the clickAndWait command is implicit. As of Selenium 2, when navigating from page to page, Selenium will automatically wait for the new page to finish loading. This, however, does not apply for any AJAX requests to finish. We will discuss AJAX waits in Chapter 5, Stabilizing the Tests.
Translating recorded tests from IDE into Ruby is rather simple, and we can get started even if we do not have any previous programming experience; learning as we go works just fine. The most exciting part is that these commands are even easier to translate from Ruby to any other programming language. Here are a couple of examples of the usage of the sendKeys() method that we used in the preceding example:
|
Language |
Command |
|---|---|
|
Ruby |
element.send_keys("cheese"); |
|
Java |
element.sendKeys("cheese"); |
|
C-Sharp |
element.SendKeys("cheese");
|
|
Python |
element.send_keys("cheese");
|
|
JavaScript |
element.sendKeys("cheese");
|
The consistency of the WebDriver API makes it incredibly easy to port your knowledge of the test from one language to another. This is great news for you, the test engineer, because you become more valuable to your company. You can be dropped in on any web project, written in any programming language, and start writing tests right away! Information and examples of different WebDriver commands in any programming language can be found at http://docs.seleniumhq.org/docs/.
The preceding example is slightly oversimplified. The action commands are written in the same format from programming language to programming language. However, writing code in different kinds of languages, such as compiled VS interpreted, will have their own idioms and best practices. Some actions that work well in Ruby would be wasteful and counterintuitive in Java.
In this section, we will implement our test case completely in Ruby. Writing a test in a new language can be intimidating, but don't despair because we will walk through and talk about every command we use. This book will not make you a great Ruby developer, but it will get you comfortable enough to write tests on your own!
Note
At this point, it is assumed that you already have Ruby and the selenium-webdriver gem installed on your computer. Please refer to Appendix, Getting Started with Selenium, for step-by-step installation instructions.
Our fully ported test into Ruby looks like this:
require 'rubygems'
require 'selenium-webdriver'

selenium = Selenium::WebDriver.for(:firefox)
selenium.get("http://awful-valentine.com/")
selenium.find_element(:id, "searchinput").clear
selenium.find_element(:id, "searchinput").send_keys("cheese")
selenium.find_element(:id, "searchsubmit").click
selenium.quit
As you can see, there are only a couple of new lines that we didn't see before. The first two lines are require 'rubygems' and require 'selenium-webdriver', which tell the Ruby interpreter that we want to use some gems; specifically, we want to the selenium-webdriver gem:
selenium = Selenium::WebDriver.for(:firefox)
In the preceding line, we request a new instance of the Firefox browser, and store it in the selenium variable. From this point on, we will reference back the selenium variable anytime we wish to give new directions to Firefox browsers. The code is as follows:
selenium.find_element(:id, "searchinput").clear
The preceding line clears any previous text from the search field. This is just a good practice anytime you wish to fill out any text field, because you never know what was left over there after some other test.
Tip
When writing a Selenium test, it is always a good practice to send a clear command into every text field you wish to fill out. Due to the unpredictable nature of JavaScript from browser to browser, the default text might not be cleared before the new desired text is entered by Selenium. By explicitly clearing each field, we avoid test instabilities.
Finally, selenium.quit is the final command of our test, which closes the Firefox browser and stops any WebDriver processes we started at the beginning of our test.
Save our test to a file as search_test.rb, and then run the following command in the terminal:
ruby search_test.rb
Tip
The preceding command assumes that search_test.rb is located in the current directory that your terminal is located in. You may need to look up some basic command-line navigation to find the location of your search_test.rb file.
After you run this command, you will see a Firefox window open; navigate to your website and search for cheese. Congratulations! Our test has been ported from Selenium IDE to Ruby, and we learned some new, fun skills such as simple Ruby commands and command-line navigation in the process!
Now that we have ported our test into Ruby, you probably noticed that even though our test does some stuff, it actually does not really test anything. Yes, it searches for cheese on the website, but it does not actually validate that anything was found or not found. As far as we are concerned, this test is a complete failure, because it not only doesn't test anything useful, but also because it has no failure condition—it will always pass.
We could write some checks in our current script to check that the search page returns the results we care about. However, this is a pretty good time to introduce Test::Unit. The Test::Unit framework is a simple testing framework that comes with Ruby. Testing frameworks allows us to better organize our individual tests and verify that everything on the page looks as expected with built-in methods called assertions.
Note
An assertion is what a test framework uses to confirm that something is a certain way. Assertions need two things to work—an expected outcome and an actual outcome. The expected outcome is defined in the test and the actual outcome is the result from the application when we run the test.
Let's convert our search test to use the Test::Unit framework. We will do this in three steps:
Convert the test file into a
CheeseFinderTestclass that inherits functionality from theTest::Unitframework.Save the new test as
cheese_finder_test.rb.Add an assertion to make the test meaningful.
After completing the first step, our test file will look like this:

As you can see, only a couple of lines in our test case actually changed:
For starters, we pulled in a new
require 'test/unit'gem on line 3Next, we declared a new class on line 5 to be
CheeseFinderTestsFinally, we created a new method called
test_find_some_cheesethat has all of our test codeLet's save this to
cheese_finder_test.rband run the following command in the terminal:ruby cheese_finder_test.rb
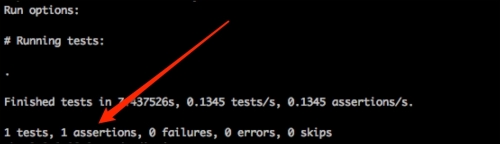
The following screenshot shows the output of the test run. The period (.) character in the middle of output, pointed out by the arrow, represents a single passing test. If a given test fails, you will see an F character in that position:

This is pretty cool, isn't it? We got all of this information about our test by only adding 3 new lines of actual code! As our suite keeps growing, these statistics will continue to change, and the test count should keep going up while failure count should stay down.
However, as we can still see, there are 0 assertions in our test. Let's add some assertions so that we are actually testing something!
Test::Unit comes with many different assertions, and the most commonly used ones are assert and assert_equal to test whether something is true or two items equal each other, respectively. In this test case, we will be using the
assert method to check whether the search for cheese gives the No Results Found message.
Note
A list of all supported assertions can be found at http://ruby-doc.org/stdlib-2.1.0/libdoc/test/unit/rdoc/Test/Unit/Assertions.html.
Let's walk through the individual steps required to add assertions to our tests:
To make this assertion work, we will use the
find_elementmethod we used previously to find theentryclass on the page; theentryDIV will contain all of the search results on the page. The code for this is as follows:selenium.find_element(:class, "entry")Once we find the
entryelement, we can use thetextmethod to get the full string seen on the page:selenium.find_element(:class, "entry").textFinally, we will use the
include?method on the returned text string. This Ruby method returnstrueif the characters we are looking for are present in the string. The code looks something like this:selenium.find_element(:class, "entry").text.include?("No Results Found")After all of this is set up for the assertion, we can now pass in the result of the word search into an assertion. As long as we keep getting No Results Found, our tests will keep passing. Let's take a look at the final version of our test:

Let's rerun our test; we should now see (as shown in the following screenshot) that the assertion count went up from 0 to 1:
Our test is now officially testing the website! But we are not done yet; let's see what will happen when we force it to fail. Let's modify line 13 to expect a different result:
Tip
Never consider a test complete unless you have seen it fail due to incorrect expectations. Often in a rush to get a test complete, we forget to test that it fails when it should, which gives us false green builds. These types of tests are not just useless, but harmful as they give us a false sense of security about the build.
Our modified code looks like the following:

By modifying the expected result to say 5 Results Found, our test will fail in the following manner:

Our test has passed once and failed once, we can officially call it complete!
Note
In the current state of our test, on assertion failure the test suite exits but does not close the Firefox window. This allows us to examine the last page our test finished on. In Chapter 3, Refactoring Tests, we will discuss the teardown method, which will clean up the test environment every time the test finishes.
Nothing is more exciting than to see your tests running, and running fast—really fast! Computers are great at taking bad instructions and running them really fast. The problem, of course, comes from the fact that when something goes wrong it is too fast for you to see it. You will run into a test failure, which no one can explain, almost on a daily basis. Tests, which fail intermittently, can be the source of frustration in your life. But don't despair; there are ways to track them down and fix them.
We will go into detail on how to track down and get rid of intermittent test failures in Chapter 5, Stabilizing the Tests. But in this section, we will take a look at a simple tool built into Ruby, called debug. Since Ruby is an interpreted language, you are able to stop test execution on any of your test environments without any fancy debugging tools. Let's play around with it, I promise it will be fun! Perform the following steps:


We have halted our test execution and entered into the Interactive Ruby Shell (irb), which is a command-line tool for controlling Ruby. This is a great tool for debugging tests, because all of the memory objects are available at your fingertips. You can "quite literally" control your tests from here if you type in the proper commands. Let's take it for a spin.
In the terminal irb session, type in selenium.get("http://seleniumhq.org") and hit the return (Enter) key on the keyboard.
Note
With Ruby 2.X, you will need to press the n + return buttons before you are able to take advantage of the selenium variable. Ruby 2.X tends to halt the execution in the Kernel class, which is one step before line 10 of our test file. By sending the next line command in irb, we step back into the test file and have access to the selenium variable.
Now watch the browser navigate to Selenium's website! You can run clicks, asserts, or anything else your tests can do and more. You are able to walk through your tests one line at the time, step into any method, or completely alter the course of the test. Here are some basic commands on how to control your test:
|
Description |
Command |
|---|---|
|
| |
|
| |
|
Continue |
|
|
|
The debugging tool mentioned here is by far the simplest tool available. It is built into every version of Ruby, but will not give us any fancy features. In compiled languages such as Java or C#, we can rely on the IDE to provide a user interface rich debugger. For a feature-rich debugger in Ruby, check out the Pry gem found at http://pryrepl.org/.
This concludes our first chapter; we got a lot accomplished in it. First we discussed the advantages of using Selenium and other OSS tools over the expensive commercial tools. After that we installed Selenium IDE and recorded our first test script, followed by the step-by-step deconstruction of each command performed in the script.
We then proceeded to convert the recorded test into Ruby programming language, comparing each command from the IDE with its Ruby equivalent. Finally, we started working with the Test::Unit testing framework and then learned about test assertions. We finished the chapter by making the test fail on purpose and played with the Ruby debugger. In the next chapter, we will add a couple of new tests and start to dive deeper into the Test::Unit framework. We will also talk about test suite design patterns that emerge from growing your test suite.